After months of cold weather, your lawn is in need of some tender loving care to revive its lush green beauty. At Frontier Landscaping, we understand the importance of proper spring lawn care to ensure your yard thrives throughout the seasons.
Rake and Remove Debris
The first step in spring lawn care is to clear away any debris that has accumulated over the winter. Fallen leaves, branches, and other debris can smother the grass and prevent healthy growth. Raking also helps to loosen matted patches of grass, allowing air and nutrients to reach the soil.
Survey Your Lawn for Trouble Areas
Our soil in many areas can have a large percentage of clay. This can make the soil heavy and affect root growth. The soil can get compacted and create drainage issues. Loosening the soil can be done through aeration, but in some cases, a landscape drain may need to be installed.
Lawns can become habitats for pests, diseases, and weeds. We can help you identify a proper treatment plan to keep your lawn looking green and lush.
Aerate the Soil
Compacted soil can inhibit root growth and water absorption, leading to a lackluster lawn. Aerating your lawn in the spring helps to alleviate compaction by creating small holes in the soil, allowing air, water, and nutrients to penetrate deeply.
Additional benefits of aeration:
- Limits fertilizer runoff
- Improves ability to absorb water
- Slows buildup of thatch
- Builds strong root system and layer of topsoil
Overseed Bare Patches
Winter can be harsh on your lawn, leaving behind bare patches where the grass has died off. Overseeding these areas in the spring helps to fill in the gaps and promote a thick, healthy lawn.
Fertilize Strategically
Spring is the ideal time to fertilize your lawn, providing essential nutrients to support healthy growth. However, it’s important to fertilize strategically, using the right type and amount of fertilizer for your lawn’s needs. Too much fertilizer can lead to excessive growth and nutrient runoff, while too little can result in a lack of growth and a healthy appearance.
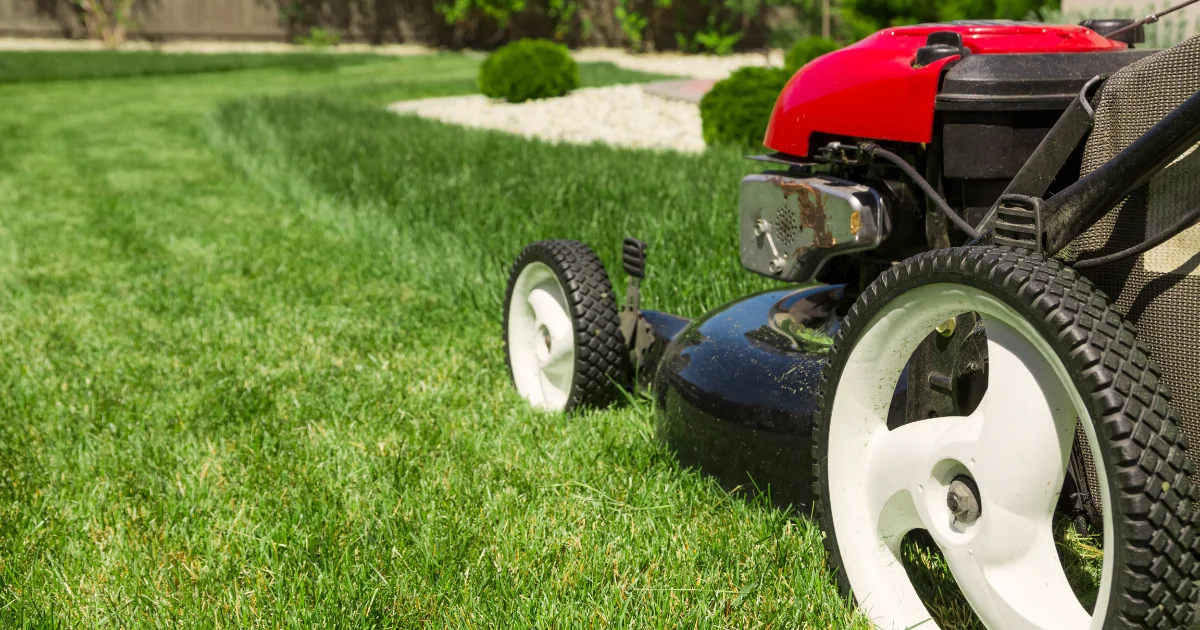
Mow with Care

As your lawn begins to grow in the spring, it’s time to pull out the lawnmower. However, resist the urge to cut the grass too short, as this can stress the lawn and make it more susceptible to disease and weeds. Instead, try to mow at a height of around 3 inches the first time you mow.
By following these essential spring lawn care tips from Frontier Landscaping, you can help your lawn thrive throughout the season and beyond. With a little bit of effort and attention now, you can enjoy a lush, green lawn that enhances the beauty of your home for months to come. Our maintenance crew can schedule regular visits to keep your yard looking its best.


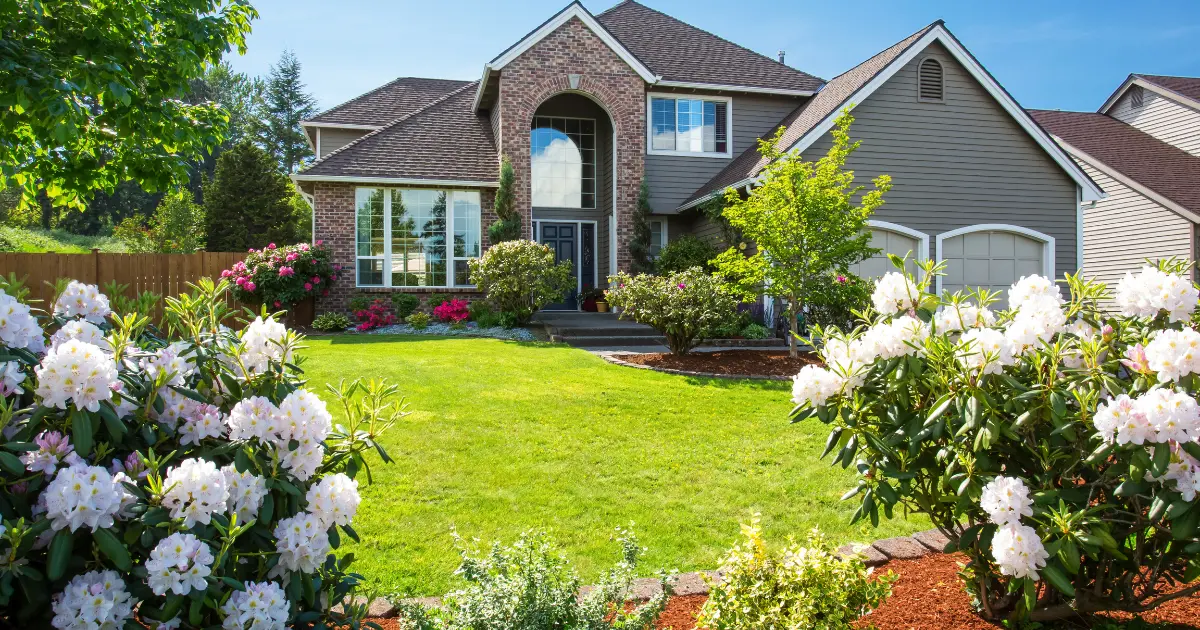
Your front yard is the first thing visitors see when they approach your home, making it the perfect canvas to showcase your style and create a welcoming atmosphere. With the right landscaping ideas, you can transform your front yard into a stunning outdoor space Here are some ideas to consider to add curb appeal to your home.:
Create a Welcoming Entryway
Design a pathway leading to your front door using materials like stone, bricks, or pavers. This pathway can be bordered with plants or flowers to add color and interest.
Focus on Symmetry
Symmetrical landscaping often creates a balanced and pleasing appearance. Flank your entryway with matching planters, shrubs, or trees.
Add Colorful Plants
Choose a variety of plants, shrubs, and flowers that bloom at different times of the year to ensure year-round color. Consider incorporating perennials for low-maintenance beauty.
Create Visual Interest with Layers
Incorporate layers of plants, varying in height and texture, to add depth and visual interest to your front yard. Use taller plants or trees in the back, medium-sized plants in the middle, and low-growing plants or groundcovers in the front.

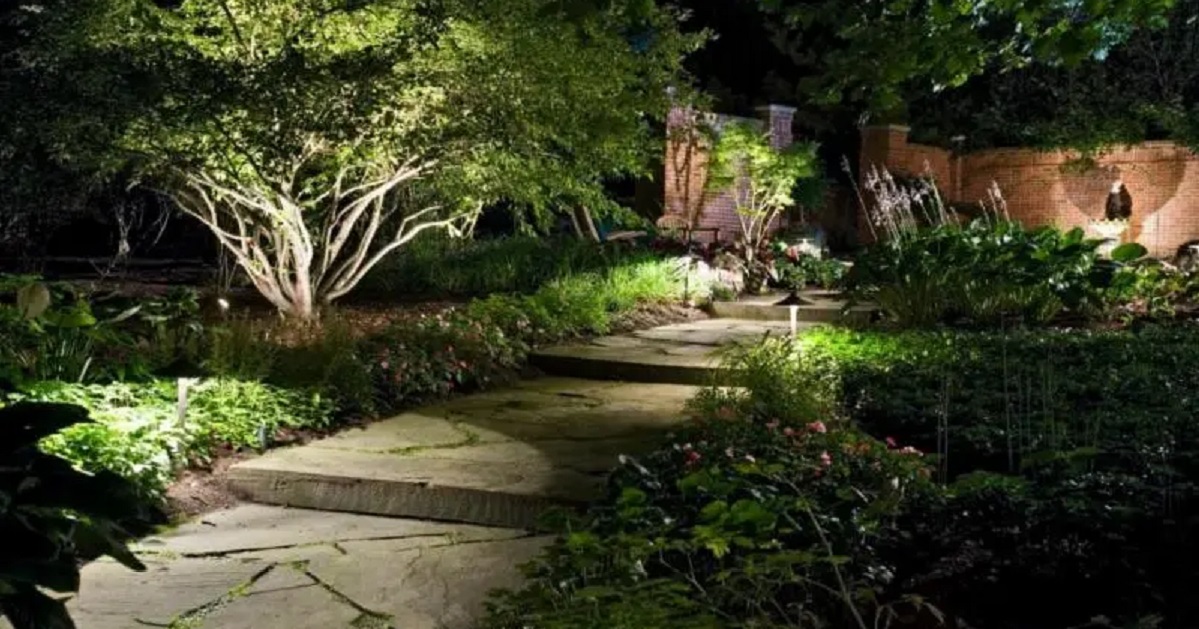
Install Outdoor Lighting
Lighting can highlight key features of your front yard and improve safety and security. Consider adding path lights, spotlights, or lanterns to illuminate walkways, trees, and architectural elements.
Include Hardscape Elements
Integrate hardscape features like a small patio, seating area, or decorative wall to add structure and functionality to your front yard. These elements can also serve as focal points.
Choose Appropriate Scale
Consider the size of your home and yard when selecting plants and landscaping elements. Larger homes may require larger plants and features, while smaller homes may benefit from smaller-scale landscaping.

Water Features
A fountain, pond, or birdbath can add a sense of tranquility to your front yard. Water features also attract birds and other wildlife.
Incorporate Edging and Mulch
Define garden beds and pathways with decorative edging materials such as bricks or stones. Mulch can help retain moisture, suppress weeds, and give your landscaping a polished look.
Beautify Your Hillside
Hillside landscaping techniques allow you to use every part of your yard, even if you think no foliage can thrive on sloped terrain. There are many plants that not only thrive on hillsides but control erosion, too.
When planning your front yard landscaping, it’s also a good idea to consult with landscaping professionals for advice and assistance in creating a design. Frontier Landscaping has experience designing and installing beautiful patios, paths, retaining walls, water features, and more! Contact us today for a free estimate!

Water conservation is an increasingly critical topic in today’s world, where freshwater resources are becoming scarcer due to factors like climate change and population growth. Saving money is an essential benefit of water conservation too. Fortunately, there are numerous ways individuals can contribute to water conservation efforts right in their own homes and yards. Here are some tips to conserve water and reduce your environmental footprint:
Fix Leaks Promptly: Leaky faucets, toilets, and pipes can waste significant water over time. Check for leaks often and repair them promptly to prevent water waste.Monitor your monthly water bill so you notice any spikes in water use when there shouldn’t be any.
Install Water-Efficient Fixtures: Replace old, inefficient toilets, showerheads, and faucets with water-efficient models. Look for products with the WaterSense label, which indicates they meet high-efficiency standards set by the Environmental Protection Agency (EPA).
Take Shorter Showers: Cutting down on shower time can save gallons of water each day. Consider installing a low-flow showerhead to reduce water usage without sacrificing water pressure.
Conserving water in your landscape is essential for both environmental sustainability and cost-effectiveness. Here are some practical tips to help you conserve water in your yard:
Harvest Rainwater: You may think we already have enough rain here so why harvest rainwater? Our summers are dry and hot, making a supplemental water supply helpful. Rainwater harvesting systems, including rain barrels and cisterns, offer an eco-friendly solution.

Choose Drought-Resistant Plants: Opt for native or drought-resistant plants adapted to your local climate. These plants require less water to thrive and can withstand dry conditions better than non-native species.
Group Plants with Similar Water Needs: Arrange your plants based on their water requirements. Grouping plants with similar watering needs together allows you to water more efficiently and avoid overwatering or underwatering specific areas.
Mulch Garden Beds: Apply a layer of organic mulch, such as wood chips or shredded bark, around plants and garden beds. Mulch helps retain soil moisture, suppress weed growth, and insulate plant roots from temperature fluctuations.
Water Wisely: Water your landscape during the early morning or late evening to minimize evaporation and reduce water loss due to wind. Use automatic drip irrigation systems or soaker hoses to deliver water directly to the root zone of plants, minimizing runoff and waste.

Adjust Sprinklers Properly: Ensure your sprinkler system is efficiently adjusted to water plants and lawn areas. Avoid watering sidewalks, driveways, and other non-vegetated areas, and adjust sprinkler heads to prevent overspray and runoff.
Sweep, Don’t Hose: Instead of using a hose to clean driveways, patios, and sidewalks, use a broom or rake to sweep away debris instead of turning on your hose. This simple switch can save gallons of water per minute.
Need help with water conservation in your landscape? Give us a call for a free estimate, and we can see where you could make changes to conserve water.

Installing a drip irrigation system can be a great idea to save both time and water. This efficient watering method conserves water and ensures that plants receive the right amount of moisture directly at their roots. So how long does it take to install a drip irrigation system? If installing a drip irrigation system, you need to determine the size of the area to be irrigated, and what type of drip irrigation system you want to use. A drip drip irrigation system can take anywhere from a few hours to a couple of days.
A simple drip system can be set up for smaller garden beds or containers in a few hours. This involves laying out the main water line, attaching the drip tubing to deliver water to individual plants, and securing the system.
Larger-scale installations covering landscaped areas may require more time and planning. In these cases, careful measurement of the area, designing the actual layout of the system, and ensuring proper water pressure and flow rates are important steps that can add to the installation timeline. Additional time may be needed if you are burying main lines and securing them in place.
Factors Affecting How Long it Takes to Install a Drip Irrigation System
The factors that can affect how long it takes to install a drip irrigation system may include:
- The terrain where you are installing it
- Your soil type
- Presence of rocks or tree roots that you may encounter
- The experience of the person installing the system

Addressing these challenges may involve digging trenches, installing pressure regulators and filters, and troubleshooting any issues that come up.
It’s important to ensure that you provide enough irrigation for all plants evenly. Testing is required for a while to ensure that your system is performing as it should and that any modifications are made.
Frontier Landscaping provides expert irrigation services, including sprinkler and irrigation system repair and installation of new systems as well as updates to existing ones. An irrigation system can help you to banish the endless task of watering by hand. At Frontier Landscaping, we design and install a wide variety of systems for a broad range of landscapes. Give us a call today for a free estimate!

The beauty of a Mediterranean garden lies in its ability to transport you to a place where the sun-drenched landscapes meet the soothing whispers of the sea. A Mediterranean landscape has become popular for its vibrant colors, aromatic herbs, and a sense of tranquility.
Mediterranean Garden Design Principles:

The essence of a Mediterranean garden lies in its simplicity. Design principles often incorporate clean lines, uncluttered spaces, and a harmonious blend of natural elements. Opt for minimalist pathways, low walls, and open spaces that encourage a seamless flow throughout the garden.
A palette inspired by the sun-soaked landscapes is nice for these gardens. Choose warm, earthy tones like terracotta, sandy beige, and muted greens for hardscape elements like pots, walls, and pathways.
Water Features
Mediterranean gardens often feature water features like fountains, reflecting pools, or small cascading waterfalls. These add a refreshing touch to the environment and evoke a sense of calm and tranquility reminiscent of the coastal regions.
From Olive trees and lavender to grapes and lemon trees, the Mediterranean garden highlights different plants known for their beauty and fragrance as well as origin and popularity in the region.
Mediterranean Garden Plants

Aromatic Herbs and Fragrant Plants
Infuse your garden with the scents of the Mediterranean by using aromatic herbs like rosemary, lavender, thyme, and sage. These contribute to the sensory experience and have practical uses in the kitchen. These herbs also conserve water in any climate.
Drought-Tolerant Plants
Mediterranean regions are known for their hot, dry climates; your garden should reflect that resilience. Opt for using drought-tolerant plants that thrive in arid conditions and contribute to the Mediterranean look and feel.
Plants for the Mediterranean garden include:
- Jerusalem sage
- Sun Roses
- Ceanothus
- Blue Fescue Grass
- Artemesia
- Euphorbia characias ‘Wulfenii’
- Grapes
Trees for the Mediterranean garden include:
- Olive Trees
- Lemon Trees
- Fig Trees
- Bay Laurel
Mediterranean style gardens allow you to create beautiful outdoor living spaces with comfortable seating, terracotta-tiled patios, and pergolas draped in vines. These spaces will have you enjoying the beauty of your landscape while embracing the Mediterranean feel.
Looking for help creating the perfect garden? Frontier Landscaping has over 35 years of experience designing and installing beautiful patios, paths, retaining walls, water features, and more! Contact us today for a free estimate!

The allure of lush greenery and meticulously shaped topiary foliage is unique and attention-grabbing. These living sculptures bring an artistic touch to your landscape, adding a sense of refinement and order. Enhance your outdoor space by incorporating topiaries.
Incorporating Topiaries into Landscape Design:
Topiaries can serve various roles in your landscape design, from creating focal points to defining borders and pathways. Placing strategically trimmed boxwood spheres along a garden path or flanking an entrance provides a sense of symmetry and order.
Consider incorporating animal-shaped topiaries, such as rabbits or peacocks, into your garden for a whimsical touch. These charming additions add a playful element while maintaining the elegance associated with topiaries.
Popular Plants for Topiaries:

Boxwood: Known for their versatility and resilience, boxwood topiaries are popular. They can be shaped into various geometric forms, including cones, spheres, and spirals, providing a structured and formal appearance.
Rosemary: These fragrant and hardy topiaries are beautiful and serve a bonus purpose in the kitchen. Their aromatic leaves make them excellent choices for both ornamental and culinary gardens.
Arborvitae, with its vibrant green foliage and conical shape, is an excellent choice for those seeking a touch of evergreen elegance in their landscape. Known for its hardiness and adaptability, arborvitae topiaries can withstand various climates. These popular shrubs can be pruned into columns or pyramids, providing a year-round focal point in your garden. As a bonus, they can also serve as a natural privacy screen.
Bay laurel topiaries add a Mediterranean flair to your landscape with their glossy and aromatic leaves. These topiaries not only contribute to the visual appeal of your garden but also offer culinary benefits. Prune them into graceful, compact shapes such as spirals or standards, and you’ll have a fragrant and practical addition to your outdoor space.
Privet topiaries can add classic beauty to formal garden designs. With their small, dark green leaves, privet lends itself well to shaping into neat geometric forms, such as cubes or cylinders. They can be used to define garden borders, create pathways, or create entrances.
Holly topiaries can be sculpted into various shapes, including pyramids and globes. Consider placing them near entrances or as focal points in winter gardens.
Pruning Requirements for Topiaries:
Regular pruning is the key to maintaining the sculpted perfection of topiaries. Topiaries must be trimmed during the growing season, typically spring and early summer, to encourage healthy growth.
Start by removing dead or diseased foliage, then carefully shape the topiary according to your desired design. Consider using a wireframe as a guide for intricate shapes. Remember to prune regularly to prevent overgrowth and maintain the crisp lines that make topiaries appealing.
Explore the world of topiaries for fun and function. Frontier Landscaping has expert landscape pruning, design, and installation services. Contact us today for a free estimate!

Gardens are not just for enjoying during daylight hours. A night garden designed with moonlight in mind can enhance your landscape with a beautiful collection of plants and lighting. Let’s explore the key elements to craft your own magical night garden.
Choosing the Right Plants
When selecting plants for a night garden you should create a list of plants that grow well in your area, bloom at night or are white or silver in color to create an effect. The plants chosen ideally would come to life under the moonlight. Opt for flowers that bloom at night, such as fragrant jasmine, white nicotiana, or evening primrose. These plants not only add a touch of elegance but also release captivating scents, enhancing the overall ambiance. Incorporate silver-leaved plants like artemisia or lamb’s ear to reflect moonlight and create a shimmering effect.
To add depth and texture, consider including plants with variegated foliage, such as hostas or caladiums. These will catch and reflect the available light, providing a visually appealing contrast. Don’t forget to add some native night-blooming species to attract moths and other pollinators that thrive in the twilight hours.

Moonflower (Ipomoea alba): As the name suggests, these large, white flowers open in the evening, emitting a sweet fragrance that attracts moths and pollinators.

Night-Blooming Jasmine (Cestrum nocturnum): With its small, tubular, white flowers, night-blooming jasmine releases a rich, sweet scent at night.
Angel’s Trumpet (Brugmansia): With its large, trumpet-shaped flowers that hang downward, angel’s trumpet releases a strong, sweet fragrance in the evening.
Nicotiana (Nicotiana alata): Also known as flowering tobacco, nicotiana produces clusters of fragrant, trumpet-shaped flowers that open in the evening.
Pee Gee Hydrangea: Also known as Hydrangea paniculata ‘Grandiflora’ this white hydrangea has conical blooms from midsummer to fall.
Night Gladiolus: Gladiolus tristis, or the night gladiolus, are pale yellow or a striped dark yellow and green flower that will bloom in the evening with a spicy scent in spring and summer.
Silver Dust (Artemisia schmidtiana): This silver-leaved perennial adds a touch of elegance to the night garden. The silvery foliage reflects moonlight.
Lamb’s Ear (Stachys byzantina): With its soft, fuzzy leaves, lamb’s ear not only adds texture but also reflects light.
Caladiums: These tropical plants with vibrant, heart-shaped leaves bring color and texture to your night garden. The foliage creates contrast in the moonlight.
Four O’Clocks (Mirabilis jalapa): These fragrant flowers open in the late afternoon and continue to bloom into the evening. They come in a variety of colors and are known for their sweet scent.
Datura (Datura spp.): Also known as moonflower, datura produces large, trumpet-shaped flowers that bloom at night.
Note: Some of the above plants are poisonous so be cautious if planting around pets or small children.
Illuminating the Night Garden

Strategically placed lighting transforms your night garden into a beautiful nocturnal retreat. Opt for warm, soft lighting that mimics the moon’s gentle glow. String lights, fairy lights, or solar-powered lanterns draped through trees or along pathways are easy ways to illuminate your garden. Consider incorporating LED lighting.
For a touch of drama, use uplighting to highlight the unique shapes and textures of trees and larger plants. This not only adds visual interest but also creates captivating shadows that dance with the breeze. Pathway lights or low-level ground lighting can guide your way while maintaining the mystical ambiance of the night garden.
Other Additions to a Night Garden
Water Features

To elevate your night garden experience, consider adding features like a water element. A small pond or fountain not only provides a soothing soundtrack but also reflects light, enhancing the overall luminosity of the space. Lighting can be added to water elements for nighttime enjoyment as well.
Warm Up the Evening
When the evenings get chilly you may consider adding an outdoor heater or fire pit. You can extend your outdoor time in the garden if it’s comfortable for you and your guests. We are experts at designing your fire pit to integrate into other areas of your landscaping so you can enjoy it year round.
Wind chimes or even outdoor speakers can bring a melodic element to your garden, creating a tranquil soundscape that complements the rustling leaves and chirping crickets. Comfortable seating will allow you to stay longer into the evening to enjoy your garden.
We can help you create a night garden for hours of enjoyment once the sun goes down. Contact Us Today for a free consultation!

Although we love our sunshine in the Pacific Northwest, there are many amazing plants that can be grown in full shade. Using a little creativity, you can transform a shady space in your landscape into a thriving shade garden.
Shade comes in various forms, ranging from light to deep shade. Really look at the light conditions of your garden to figure out the type of shade it receives, as this will influence the plants that will thrive there. Also keep in mind that when the foliage of deciduous trees is gone, the shade garden will be more exposed to weather.

Shade gardens can offer an extensive palette of foliage colors, textures, and shapes. Consider incorporating a mix of shade-loving perennials like hostas, ferns, and astilbes. These plants bring visual interest and thrive in the cooler, shaded corners of your garden.
Shade Garden Plants for the Pacific Northwest

- Hellebores (Lenten rose)
- Bleeding Heart
- Pacific Trillium
- Brunnera
- Bergenia
- Hosta
- Bugbane
- Siberian Bugloss
- Oakleaf Hydrangeas
- Sweet Box
- Gold Dust Plant
- Oceanspray
- Sword Fern
- Astilbe
- Hetz’s Japanese holly
- Toad lily
Regular maintenance is key to a thriving shade garden. There are some tasks that are slightly different from those required of their sun-loving counterparts.
- Keep an eye on moisture levels so the plants are receiving the right amount of water but not too much. Leaves that remain wet after water for long periods of time in the shade can get fungal diseases. Avoid watering in the late afternoon.
- Prune any overgrown plants and remove any diseased foliage promptly.
- Mulching is important for a healthy shade garden. A layer of organic mulch helps retain moisture, suppress weeds, and regulate the soil temperature. It can also help with drainage to avoid overly wet conditions.
A shade garden can be a wonderful space for relaxation and an eye-catching addition to your landscape. Let our experienced team help you design and install a shade garden. Call for a free estimate today!

Incorporating drainage solutions doesn’t mean sacrificing the beauty of your landscape. Due to our rainfall, incorporating drainage is necessary to preserve the health of your plants, protect your home, and prevent erosion. Well-designed drainage solutions should become an integral part of your landscape.
Preserving Plant Health
Proper drainage is paramount to the health of your plants. Stagnant water around the roots can lead to root rot and other water-related diseases, compromising the vitality of your greenery. By incorporating drainage solutions such as French drains or gravel-filled trenches, you allow excess water to escape, preventing waterlogged soil and safeguarding the well-being of your plants.
Erosion Prevention
One of the most significant threats to a well-manicured landscape is erosion. Sloping terrain and heavy rainfall can lead to soil erosion, washing away valuable topsoil and leaving behind barren patches. Integrating solutions like retaining walls and strategically placed rocks helps control water runoff, prevent erosion, and maintain the structural integrity of your landscape.
Hardscape Protection
Proper drainage isn’t only about safeguarding your plants; it’s also about protecting your hardscape elements. Paved surfaces, such as driveways and patios, can suffer damage from standing water or excessive runoff. Installing permeable pavers or creating designated drainage channels ensures that water is directed away from these surfaces, preventing cracks, uneven settling, and other forms of deterioration.
Basement and Foundation Preservation
Improper drainage can have severe consequences for the foundation of your home. Excess water pooling around the foundation can lead to cracks, leaks, and structural damage. Implementing solutions like downspout extensions and grading adjustments directs water away from the foundation, preserving the integrity of your home and preventing costly repairs.
Options for Landscape Drainage
French Drain
A French drain is a perforated pipe enveloped in gravel. It quietly redirects excess water, protecting your landscape without compromising its visual appeal. From preventing waterlogged soil around plants to mitigating flooding, the French drain is often used in Pacific Northwest landscapes.
Channel Drain
These sleek linear drains, typically positioned in paved areas, efficiently collect and redirect surface water, preventing puddling and potential damage to hardscape elements. These are often used in driveways, patios, or walkways. Channel drains can be a good solution to surface water management in your

Incorporate Dry Creek Beds
A dry creek bed is an attractive bed of rocks that simulate a creek or river running through your yard. It can be used as a focal point and aids in landscape drainage.
Rain Gardens
Rain gardens offer several environmental and practical benefits, making them a valuable landscape drainage solution and staying sustainable. Rain gardens capture and absorb rainwater, reducing the amount of stormwater runoff that would otherwise flow into storm drains and potentially overwhelm local sewer systems. By slowing down and retaining rainwater, rain gardens help prevent flooding in low-lying areas during heavy rainfall events.
Add Gravel and Mulch

Mulch and gravel can both play important roles in improving drainage in your yard, but they serve slightly different purposes. Here’s how each can contribute to better drainage.
Mulch:
Water Retention:
Mulch, especially organic mulches like wood chips or bark, helps retain moisture in the soil. While it retains water at the surface, it also allows water to percolate into the soil slowly.
Soil Structure Improvement:
As organic mulch breaks down over time, it contributes organic matter to the soil, enhancing its structure. Improved soil structure promotes better drainage by preventing compaction and allowing water to move more freely.
Erosion Control:
Mulch provides a protective layer that helps prevent soil erosion caused by heavy rain or water runoff. This protection is crucial for maintaining the integrity of the soil and preventing the loss of topsoil.
Temperature Regulation:
Mulch acts as an insulator, helping to regulate soil temperature. This can be beneficial for plant roots, and it also contributes to the overall health of the soil ecosystem.
Gravel:
Surface Drainage:
Gravel is often used as a surface material in areas where water runoff is a concern. It allows water to flow easily over its surface, reducing the risk of soil erosion and preventing puddles.
Permeability:
Gravel is highly permeable, allowing water to pass through it easily. This is useful for areas where you want to drain and prevent water from pooling.
Visual Appeal:
Gravel can be a visually appealing addition to landscaping. It’s available in various colors and sizes, allowing the creation of different pathways or decorative features while still helping the drainage in your yard.
Add Plants that Tolerate Wet Soil

Plants can absorb excess water and improve soil and drainage in your yard. You may want to consider plants that can tolerate wet soils.
Plants for Soggy Sites:
Trees:
- Bald cypress
- Tupelo
- Water birch
- Cascara
- Red osier dogwood
- Willows
Shrubs:
- Buttonbush
- Purple osier willow
- Winterberry
Perennials:
- Blue flag
- Cardinal flower
- Japanese iris
- Japanese primrose
- Umbrella plant
- Water iris
- Maidenhair Fern
Grass and rush-like plants:
- Japanese sweet flag
- Rush
- Sedge (Carex elata ‘Aurea’)
- Sweet flag (Acorus calamus)
Integrating drainage solutions into your landscape is a proactive and essential step toward maintaining a healthy, vibrant outdoor space. Our team can design and install landscape drainage solutions that are functional and attractive. Give us a call today!

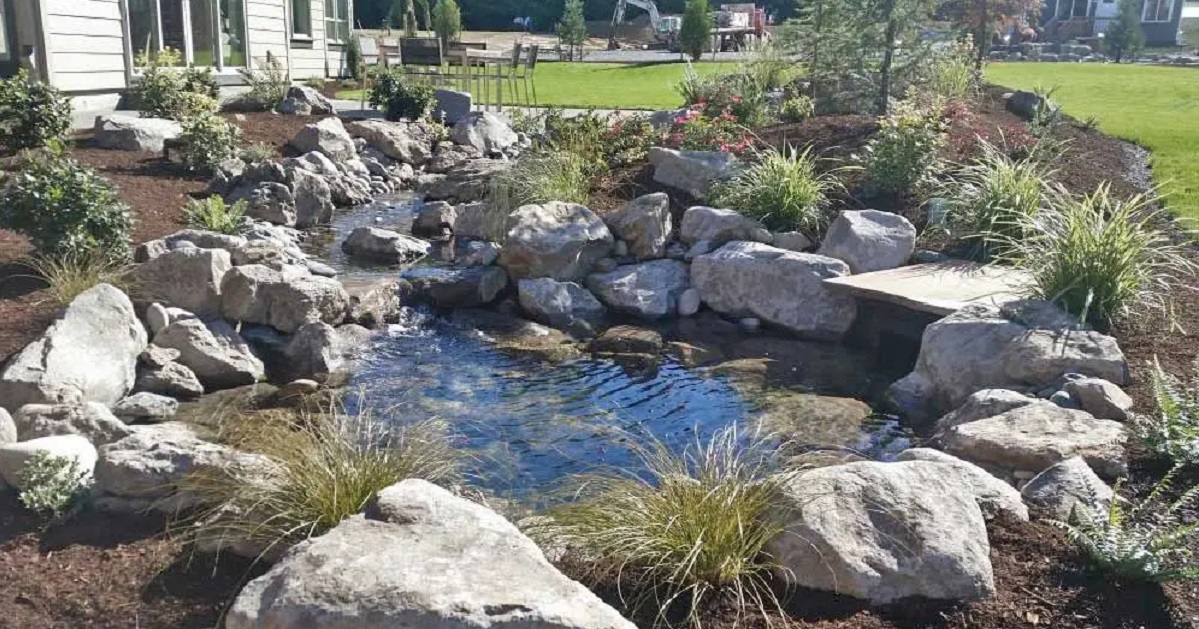
Imagine entering your backyard and being greeted by the soothing sound of flowing water, the gentle rustle of leaves, and the serenity of a well-designed water feature. Adding water features to your landscape is not just about aesthetics; it’s about creating a harmonious and tranquil outdoor space you can enjoy
Water Feature Options

- Streams or creeks that recirculate slow-moving water.
- Waterfalls provide a landscape focal point and provide calming background noise.
- Fountains create a statement, add interest, or change the mood of any landscape or garden.
- Dry creek beds accommodate and conserve seasonal rainwater in your landscape.
Provide a Tranquil Retreat
Water features can transform your outdoor space into a tranquil retreat, whether it’s a bubbling fountain, a meandering stream, or a serene pond. The sound of water has a calming effect on the mind, reducing stress and promoting relaxation. Incorporating water into your landscape design allows you to create a peaceful haven to escape the hustle and bustle of daily life.
The Aesthetic Appeal of Water Features

Water features add a touch of elegance and visual appeal to any landscape. Whether you opt for a modern, minimalist fountain or a more natural pond surrounded by lush vegetation, water features are eye-catching focal points. They create a sense of balance and harmony, enhancing the overall aesthetics of your outdoor space.
Give a Biodiversity Boost

Water elements in your yard contribute to the biodiversity of your landscape by attracting various forms of wildlife. Birds, butterflies, and even frogs are drawn to the sounds and sight of water, adding a lively and dynamic element to your garden. Their presence contributes to the ecosystem and provides entertainment and a connection to nature.
Increase Property Value
Investing in water features can significantly increase the resale value of your property. A well-designed and properly maintained water feature is a sought-after addition for potential buyers, making your home stand out in the real estate market. It’s a cost-effective way to elevate your property’s curb appeal and make a lasting impression.
Temperature Regulation
Water can help with temperature regulation. The cooling effect of water can help moderate temperatures in your outdoor space, providing relief during hot summer days. This natural cooling can make your outdoor living space more comfortable in warmer temperatures.
Creative Customization Options
One of the best aspects of incorporating water elements into your landscape is the wide range of customization options available. From the size and shape of the water feature to the materials used in its construction, you can tailor it to your preferences and the overall style of your home. Depending on the style of your garden or overall landscape, we can also design a water feature to blend with your aesthetic, like a sleek modern water bubbler or Japanese garden water element bringing natural elements together.
Whether you seek a peaceful retreat, enhanced visual appeal, or a boost in property value, water features offer a solution for elevating your outdoor space. Frontier Landscaping designs, installs, and maintains water features. We construct large, multi-featured waterscapes as well as smaller, simpler set-ups. We maintain the plantings in and out of the water, install any irrigation needed, and add outdoor LED lights for nighttime ambiance.